The Allure of the Blade
In the world of digital precision and pixel-perfect filters, there is a growing hunger for the “imperfectly perfect.” This is why palette knife painting—or impasto—is seeing a massive resurgence in 2026. Unlike the delicate, controlled strokes of a traditional brush, a palette knife allows you to “sculpt” paint onto the canvas. It is bold, textured, and deeply satisfying.
If you are looking for a way to break your digital tether and engage your “analog brain,” the palette knife is your ultimate tool. It forces you to embrace the physical properties of pigment and the spontaneous joy of a heavy stroke.
1. The Essential Kit: Your Tools
To start, you don’t need a professional studio. You need a small “Sanctuary” and the following core supplies.
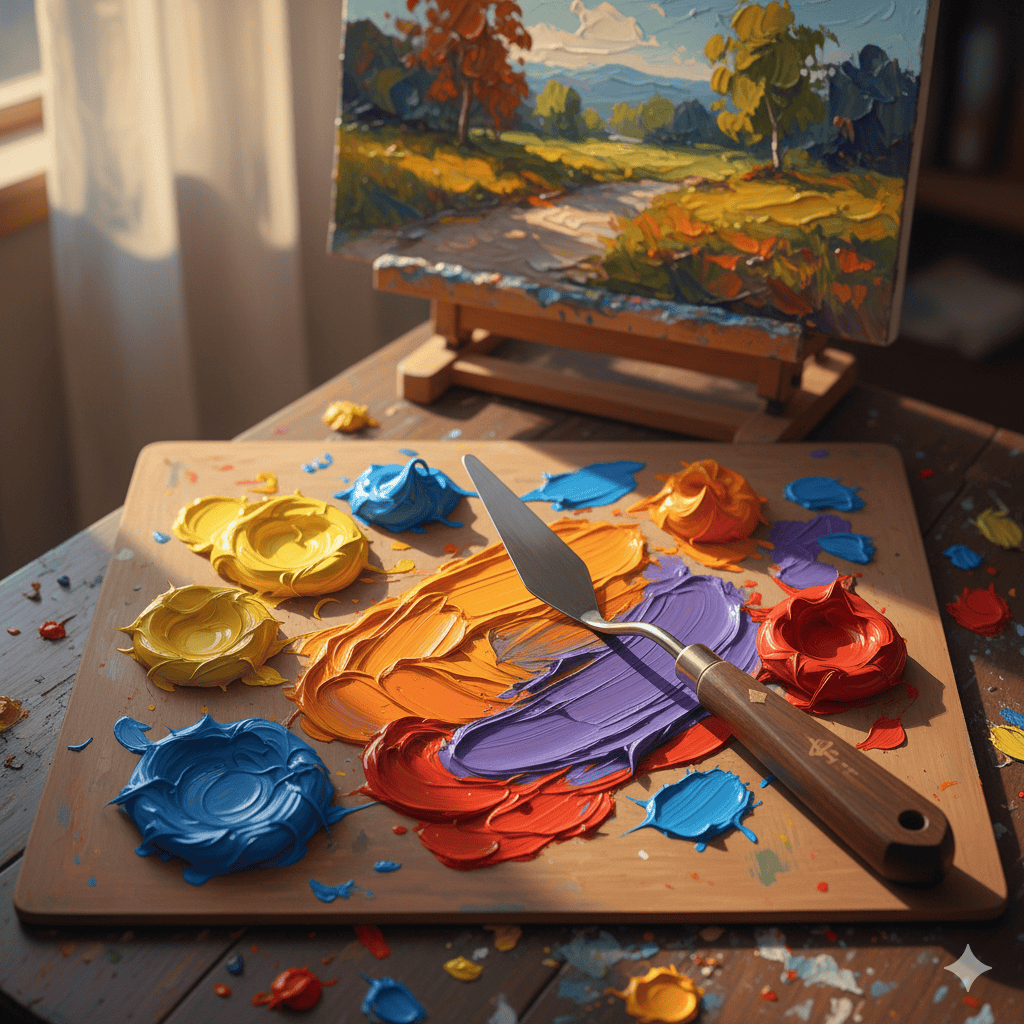
The Knives
Not all knives are created equal. You’ll see two main types:
- Palette Knives: Usually straight, designed for mixing paint on your palette.
- Painting Knives: These have a “cranked” or “stepped” handle (a bend in the metal). This is crucial because it keeps your knuckles from dragging through the wet paint on the canvas.
The Pro Tip: Start with a “Tear Drop” shape and a “Long Diamond” shape. These two will cover 90% of your needs.
The Medium: Why Acrylics or Oils?
Palette knife painting requires “body.” If your paint is too thin, it will just smear.
- Heavy Body Acrylics: Best for beginners. They dry fast, are water-soluble, and hold their shape well.
- Oils: The traditional choice. They stay wet for days, allowing you to blend and “re-sculpt” over time.
2. Setting the Scene: Your “Digital-Free” Zone
Before you squeeze a single tube of paint, you must establish the “Unplugged Protocol.”
- Phone in another room: The temptation to “document” your progress for social media will kill your flow state.
- Analogue Audio: Put on a vinyl record or a long-form radio broadcast.
- Natural Light: Position your easel near a window. The shadows created by thick paint are part of the art; you need to see them clearly.
3. Basic Techniques: The “Butter and Scrape”
Think of your paint as cold butter. The palette knife is your spreader.
The Loading Technique
Don’t dip the knife into the pile of paint. Instead, “slice” a small amount onto the underside of the blade.
The “Scrape and Smear”
- Thin Layer (The Scrape): Use the edge of the knife to drag a thin veil of colour across the canvas. This is great for backgrounds or “ghostly” trees.
- Thick Layer (The Smear): Lay the blade flat and pull. This creates the signature 3D texture.
- The Graffito: Use the tip of the knife to “scratch” into wet paint. This is perfect for hair, grass, or adding fine details like a signature.
4. Colour Theory for the Palette Knife
Because you are working with thick layers, colours will mix directly on the canvas (this is called alla prima).
- Don’t Overwork: If you move the knife back and forth too many times, your vibrant colours will turn into “mud” (a dull grey/brown).
- The “Clean Blade” Rule: Keep a roll of paper towels or a rag in your hand. Wipe the knife clean after every single stroke. This is the secret to those clean, “roaring” colours seen in the Unplugged Times illustrations.
5. Your First Project: The “Awe-Inspiring” Landscape
We recommend a landscape for your first attempt. Nature is forgiving – trees don’t have to be symmetrical, and clouds are meant to be chaotic.
Step 1: The Sky (The Gradient)
Load a large knife with blue and white. Start at the top and work down in broad, horizontal smears. Don’t worry about blending perfectly; the “ridges” of paint will look like wind or distant clouds.
Step 2: The Horizon (The Scrape)
Use a dark green or brown to scrape a thin line across the middle. This defines your ground.
Step 3: The Foreground (The Texture)
This is where the palette knife shines. Use heavy “globs” of paint. Dab the knife to create the texture of bushes or rocks. Use the edge of the knife to “flick” upwards for grass.
6. The Science of the “Creative High”
Why does this feel so good? Research from the University of the Arts London suggests that tactile hobbies like painting reduce cortisol levels by up to 45% in just 45 minutes.
When you paint with a knife, you are using “Gross Motor Skills” (the arm and shoulder) rather than just the “Fine Motor Skills” (the fingers) used for typing. This shift triggers a different neural pathway, leading to a deeper “Flow State.” You aren’t just making a picture; you are regulating your nervous system.
7. Troubleshooting Common Issues
- Paint is too flat: Your paint might be “Student Grade” (contains more water/filler). Use a Modelling Paste or Impasto Medium to thicken it.
- Knuckles hitting the canvas: You are using a palette knife, not a painting knife. Ensure your knife has that “stepped” handle.
- Muddy colours: You aren’t wiping your blade between strokes.
8. Conclusion: Reclaiming Your Creative Sovereignty
Palette knife painting is more than an art form; it is an act of digital rebellion. Every thick ridge of paint you lay down is a testament to being present in the physical world.
At Unplugged Times, we believe that the “New Rich” are those who have the time and focus to create something with their hands. So, buy the knives, hide your phone, and start sculpting your own reality.
Leave a Reply